Showing posts with label makeover. Show all posts

Monday, June 18, 2012

NEW BEGINNINGS, OLD PICTURES

Well if you haven't noticed - "Collegiate and Crafty" got a facelift! And a name change.
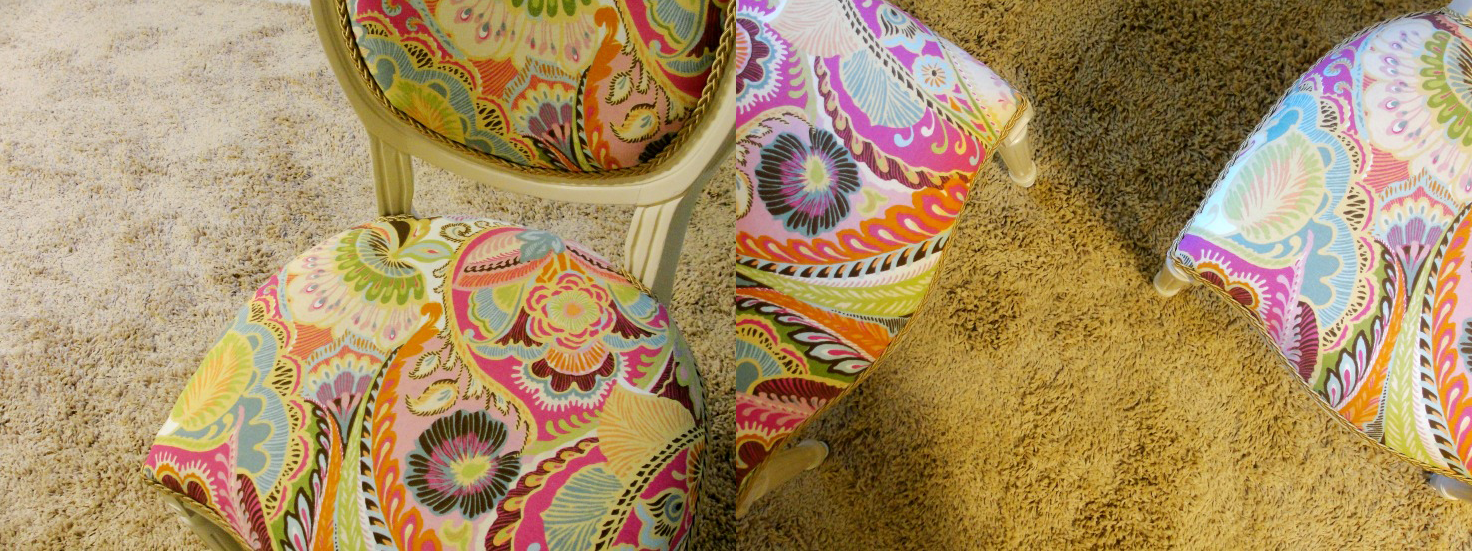
I am just in love with the bright, poppy colors. It feels so much more me. Bold, yet feminine (or at least, I'd like to believe.)

And the name change. Well. I never felt super tied to Collegiate and Crafty... it just seemed like something kitschy that matched what I was doing. I mean, I'm still doing the same things, but it just seemed like a name that wouldn't grow with me. Also, I've been contemplating an Etsy shop, so I wanted to find a name I could use on multiple platforms (I changed my Twitter name as well.)

If you're unfamiliar with the phrase "honor bright," it is from D. H. Lawrence's short story Rocking Horse Winner and basically means "honestly" or "I promise." I've always had a certain attachment to it.

Now on with the post!


I don't believe I ever posted pictures of my new place, so I took some quick snapshots to do so! The place certainly isn't done yet by any means (but you would think it would be, after living here for a year...) but these are just some of my favorite things.

Flowers in mason jar, made by mamacrafter.
Southern things tray I blogged about last June.

Wreath, also made my mamacrafter!
The jar is filled with goodies for Alecks, and the
faux-old booklet is from TJ Maxx.

Frames by the entrance. 

A year later, and the top frame is still plaguing me. HALP.
Also, this cute, yarned 'E' use to be in the top blank space,
but it tragically fell & shattered one night. Sigh.

Bought this globe & stand for $1 at a garage sale - color
me elated! Just painted the base cream to match the room.

This is my little owly, bought on sale at Hobby Lobby
around Thanksgiving. Love him.
But really, if you have suggestions for my other frame I really want to hear them. I'm tired of looking at a blank frame. Speaking of blank frames, someone please tell me I'm not the only one who buys beautiful frames only to never find the right picture for them?! Last year our fence blew down and so we had a ton of wooden planks to get rid of - enter Talia Christine's beautiful DIY wooden picture frame. So I made the frame last summer. Here's what it looks like today:

Yep. Still empty. One of these days I'll hang pictures...

Crossed fingers a lot more crafting to come this week.
Hope your Monday is lovely!

xoxo e

Thursday, January 5, 2012

DIY: First furniture makeover!

You. Guys.

My DIY heart *finally* knows the feeling of a dramatic makeover!
My parents and I went to Goodwill one day two weeks ago (completely not looking for chairs) only to find this beautiful Louis XVI chair (leaving with said chair.) AND it was marked down - to $5! FIVE DOLLARS. The frugal part of me was simply over the moon. I didn't even know the chair was marked down until I got to the register (it had a $10 price tag - still a deal.) A lover of Goodwill, I will be frequenting there more often because there was also this **fabulous** sofa that I didn't want to pay $75 for, but totally would have paid $37 for. It was gorgeous. Just like this, but an awful green color. A product of my future dream house for sure after a little makeover. 

Anyhow, onto the makeover.
I should probably first say that this is my first time making over a chair. There are probably things I could have done differently... but now that I've done one, I know there will be a next time to make those changes!

First we ripped the cording off around the seat & back. We thought about taking the seats off, but decided not to before we got in too over our heads.

Then we sanded down the paint a bit. We ended up spray painting it (using Rust-oleum Ultra Coverage in Satin Ivory Silk.) I'm not sure how smart spray painting is... but they appear fine (and even weathered a trip from Texas to Oklahoma.) The sanding helped to make sure the paint would stick.


As I said, we didn't take off the cushions - we simply stapled the fabric I bought over it. After working with the chairs a bit, I actually think they had been made over once before and done in a similar way that we ended up doing them. We hot glued the braided cord around the edges. Originally we had bought a more rope-like cord, but being the first-timers we are, we improperly measured and didn't get enough. And then could not find it again at any craft states on the other side of the border! Ugh! But I ended up liking the braided more than I thought.


Voila! Can I just tell you how much I am in LOVE with the pattern? I saw it at Joanns and could not stop smiling. I just love all the colors so much! I unfortunately didn't get the name of it, but I know it is a Waverly Fabric. The braided lining we got at Hancock Fabrics. Oh and best thing about my chair is that I didn't get one, but TWO! They actually had 4 at the store, but I settled on two to accommodate the living space I have. Also, I have no idea why the carpet looks so mustardy in the second picture...


My first made over chair, and I couldn't be happier. A fun little addition to my dorm room for sure!

I paid $10 total for both chairs, about $19 for all the fabric (twas on sale!) and about $25 for the braided liner (oof.) But overall I consider $54 a good deal for these super cute chairs.

Have any tips for the next time I go on a re-do adventure? Let me know!

Wednesday, June 29, 2011

tray makeover

I'm currently gathering up things for my big move a month from now! For my new room I decided to go with a southern shabby chic style and my color palette is mainly browns, creams, and peaches.

This is my first time kind-of, sort-of attempting to do a tutorial so please forgive me for any errors! I'm new to this whole craft-blogging thing ;)

I had really wanted to do a tray makeover for my coffee table. I luckily found this cute wooden one, and I loved the brass* handles. AND best of all, it was originally $14, but was 50% off at Joann! Deals are my favorite.


*the handles actually aren't brass at all! They're PLASTIC! I didn't find this out until I took them off to paint it... they look like the real deal!


So the first thing I did was take the handles off. When I started the project, I knew I wanted to put words on the lines rather than quotes... because when it comes to crafting I have a very short patience and want to get things done as quickly as possible - a sin when you're a crafter, I know. I chose roots, place, family & tradition from a quote that I love, "The South - where roots, place, family, and tradition are the essence of identity," by Carl N. Degler. 

Hoping I would find peach spray paint (but of course not finding it) I mixed some acrylic paints I had on hand. It's probably much smarter to use paint from the hardware store, but what can I say, my impatience strikes again. My impatience also lead to the dark dark peach color you see on the sides because it was almost night time when I first tried to do this and I totally thought I had made the right color. The second time, I mixed a bit of orange and pink and a lot of metallic white (metallic was actually the only white I had on hand, but I loved using it in the end because it had a really pretty sheen to it.) I didn't have much paint, so I tried to just paint enough that I'd have space for the letters. Note: Paint the whole bottom if you can. After I spray painted over it, there was an unevenness between the part I had painted and not painted (though it wasn't a big deal to me because I plan on putting something on the one side so you won't really notice it.) 

Back on track - after my paint had dried, I used some stickers I had on hand for the lettering. I'm sure if you have a silhouette machine, there is a much simpler/better process for this step, but this was the best I could do! The last step was to spray paint over the whole thing & pull my stickers up!


And voila! 
Excuse the messy picture, I currently live with my parents and don't have the most adequate place to photograph my finished items. When I move I'll make sure to dedicate a post to showing you the things in their new natural setting! In my actual room I plan on having a mason jar with flowers on that side of the tray, but I haven't got to make that yet, hence it's substitution :)

So there it is - my first kind-of, sort-of tutorial!

xoxo erikah